Tuesday, 23 January 2024

Tip: 4 at a time Half-square base triangles

As part of the Bonnie Hunter mystery experience, I meet with a group of ladies who share tips and tricks to make assembly of these wonderful quilts a little faster.  This is not to say Bonnie's instructions are not fantastic, because they are.  I tend to do her mystery quilts with yardage as I have not convinced myself I have a large enough stash to go scrappy.  When you use yardage, these tricks can make assembly much faster.

When we first looked at Clue 4, we need half of the block to be half square triangles cut in half, or so I thought.  The challenge is half your triangles are dark on the right and light on the left and the other half is vice versa. 

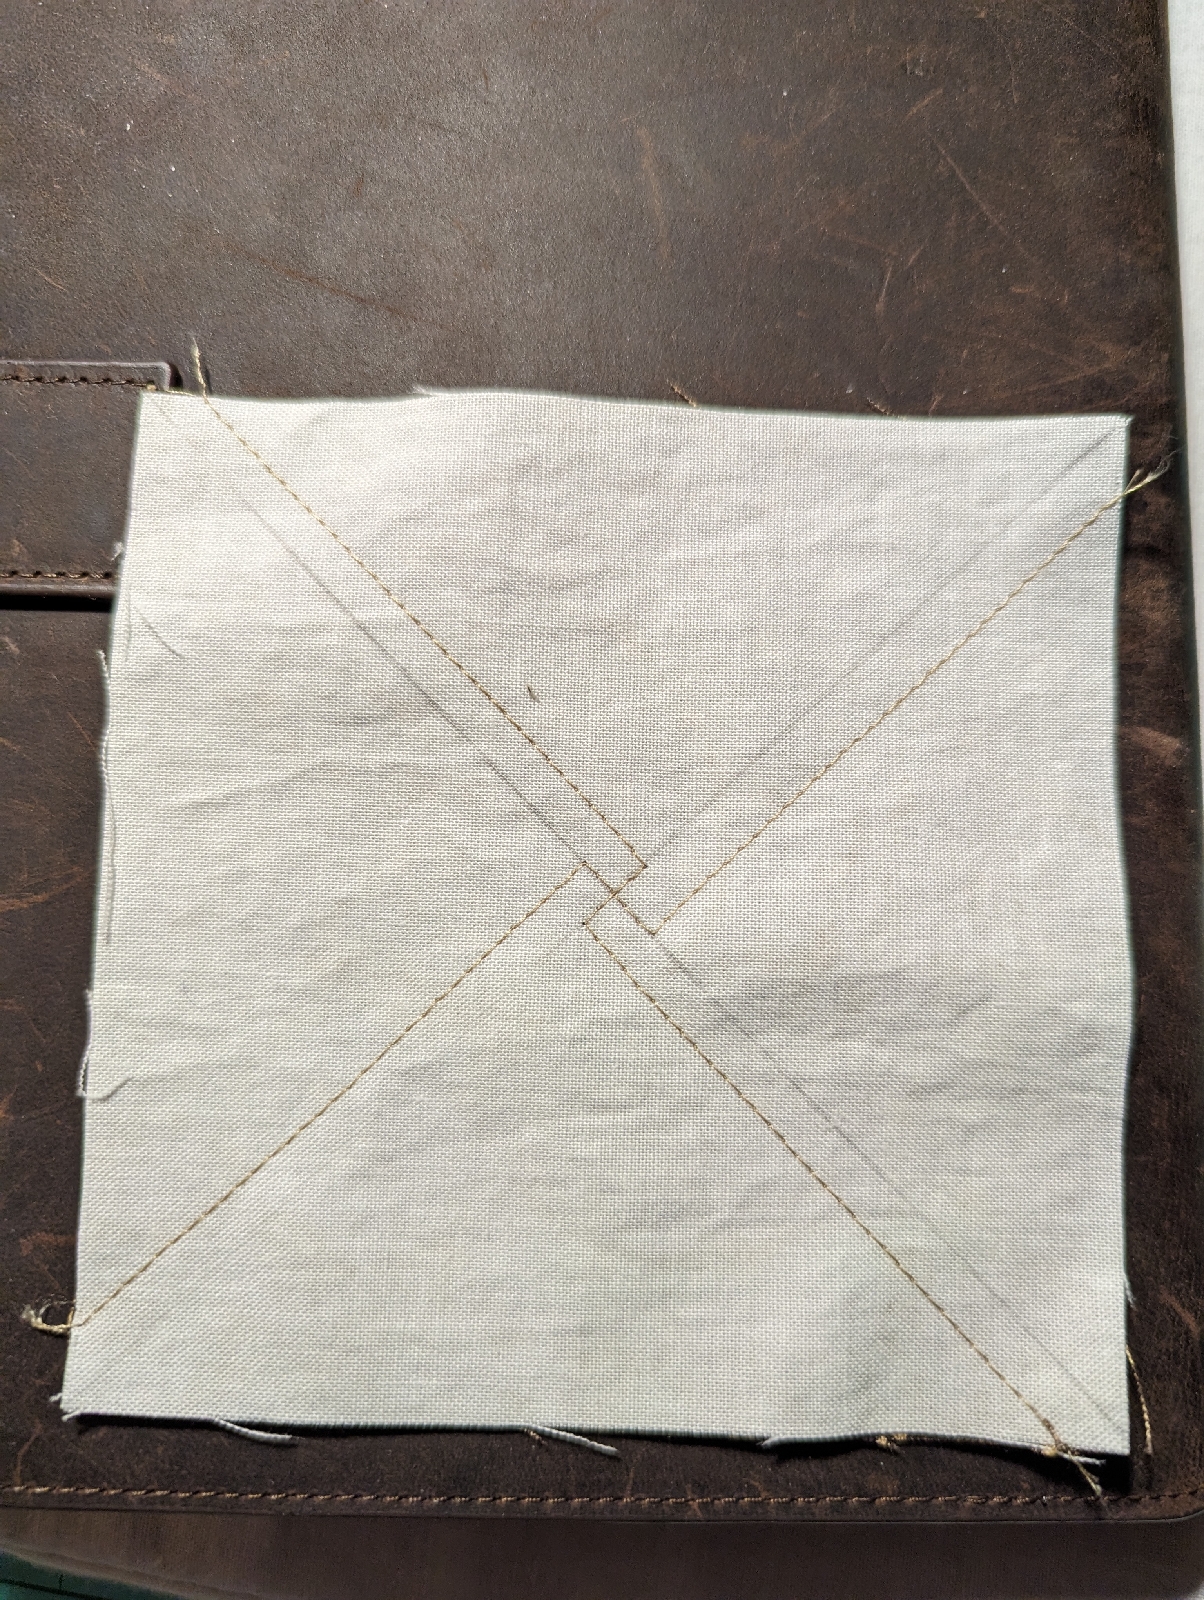
My friends came to my rescue with a new way to tackle this.  Take the light square, draw the usual diagonals.  Pair it up with the other fabric needed, right sides together, then sew two seams with a jog in the middle. 

Cut apart on the two diagonals.

Press your seams and you're ready to move on.
My quilting friends never fail to amaze me with the tricks they share.  The journey for Indigo Way continues.

Friday, 19 January 2024

What happened now?

WARNING:  There are images and descriptions that some viewers may find disturbing.  Please feel free to pass this entry if you are easily made queasy.


About one year ago, a member of our guild was working on a Bonnie Hunter mystery when she accidentally sliced her finger with her rotary cutter.  She had a nightmare recovery, but she is back quilting prolifically today.

You can see where this is going...

Just after Christmas, as I was working on a Bonnie Hunter mystery and trimming blocks with a brand new ergonomic rotary cutter I had received days earlier.


My non-dominant (left) index finger wandered off the edge of the ruler as I was slicing.  I headed up the edge of the ruler and right into my finger.  At the time, it didn't hurt, but I immediately realized I'd done something foolish.  I ran to my washroom with a concerned husband following close behind.  After bleeding through two bunches of gauze, I told him I needed to go to the hospital to have it looked at.

After a 5+ hour wait in the local emergency room, a wonderful emergency doctor came in to check out what I had done.  It was just my luck that not one, but two, ambulances had come in with victims of car accidents.  When it was my turn, I was fortunate to be immediately seen by the doctor.  He first numbed the finger and THAT was the worst part of the whole experience.  Once frozen, he had me sit in front of a sink and run the finger under water that was between lukewarm and slightly cook for 5-10 minutes.  This is KEY.  If you ever cut yourself with a rotary cutter, and I certainly hope you do NOT, those blades have an oil coating and fibers from the cloth we cut.  Flushing out the wound is key to having a chance of healing well.  He got out his suture kit, I joked about "I'll be the judge of your stitching skills sir" and he proceeded to put me back together with 5 stitches and a splint to stabilize the finger for a week.

Immediately after the stitches were completed in the hospital

For those who are curious, NO, I did not bleed on any of the fabric.

Here's what it looked like after a week when the stitches were taken out.  Another week and I was panicky as the seam was opening up.  In reality it was only the top layer or two that died off, the stitches had done their job to hold the deeper cut together.


Here it is now!


You can see where I had hit my fingernail, though it has start to grow out since this happened. I do have some nerve damage on the side of the my finger, but the tip is not too bad.  I am very, very lucky and grateful for the medical services I received.

Needless to say, when I shared this with my quilting friends, there was a run on ordering gloves to protect hands while working with rotary cutters.  Whether you use a protective glove or not, please remember that quilting is not supposed to be a blood sport.  Use caution and know when to stop of you are tired or feeling at all unwell.  Don't follow my lead on this on, please!

Friday, 5 January 2024

Welcome 2024 and first completed Quilt of the New Year!

Here we are at the start of another journey around the sun.  This past year was not what I expected.  I had thought, "No new projects", going into the start of 2023.  I guess we need to consider that goal a fail, given I added 5, no 6 new projects this year - but is that really a "fail", or just a commitment to the joy of quilting?  I've updated my UFO tracker, if you are curious.  You can find it here:  UFO tracker

Even though we are only 4 days into the new year, I already have my first quilt completion.  I tried on New Year's Eve to make this a completion for 2023, but at 11:59 I put the quilt and my needle down and conceded that I was not going to get the binding completed.  Last night, I finished the binding and the labelling of "Summer Swag".  This quilt was based on a workshop our guild held with Krista Moser.  One of the great things from the COVID pandemic was the chance for guilds to engage virtual speakers and teachers from far away for their meetings and workshops.  We had Krista come and do both - speak and lead a workshop.  I can't say how much I enjoyed her energy and positivity.

My husband came with me to select the fabrics for this quilt and it was my first time using a paper pantograph with my longarm.  I don't know if it was the pantograph pattern that was selected, or my inexperience with the longarm, but it was not my favourite way to quilt.  The next one will be a custom quilt job, to be sure!

Here is the end result, and I'm quite proud of it.
So, here's to 2024, and striving for a low cost, high completion, fewer UFOs year.  I've also set myself a target to get more engaged with this blog and hope to capture my quilting journey as I progress forward.